
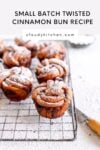
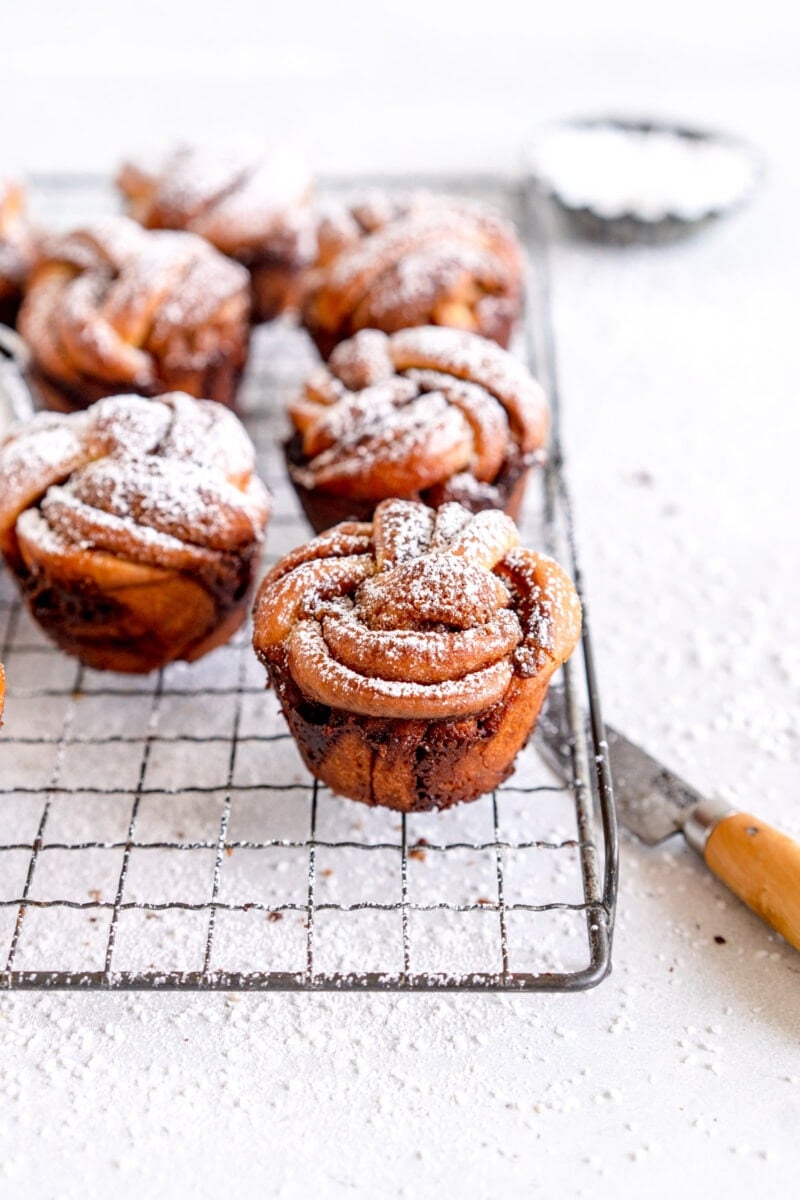
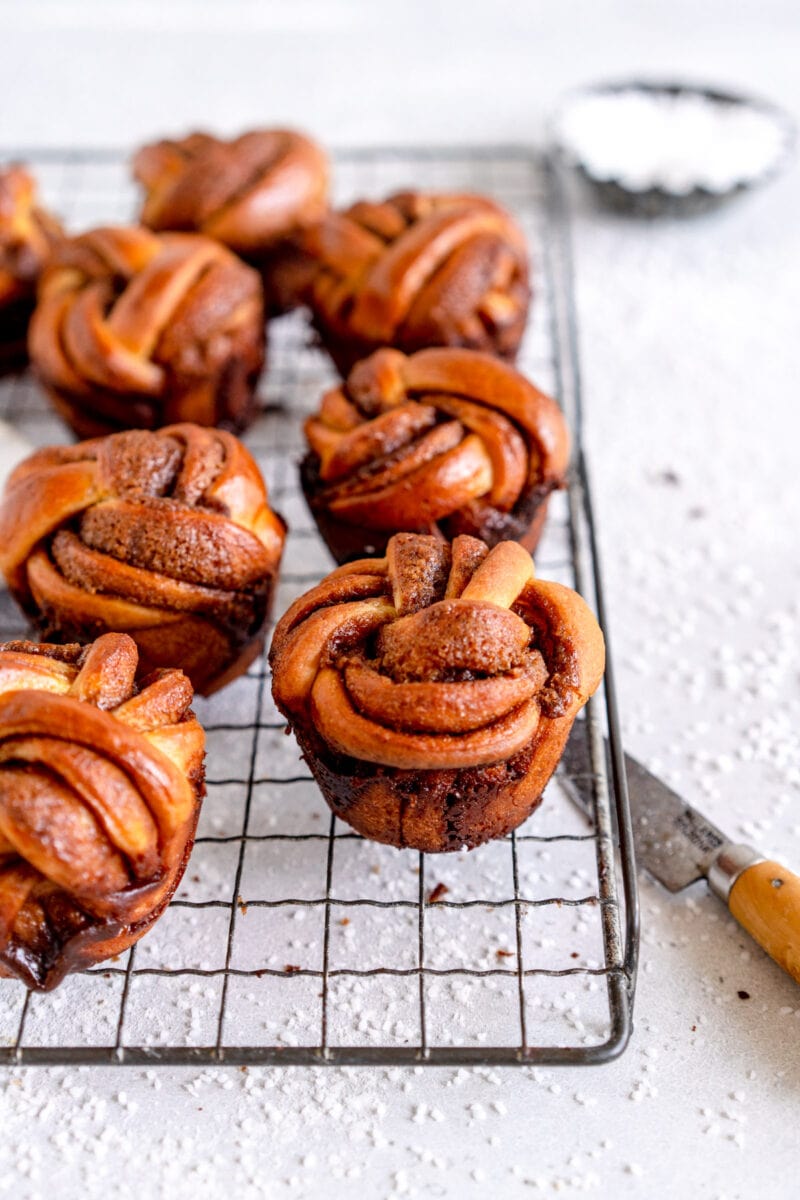
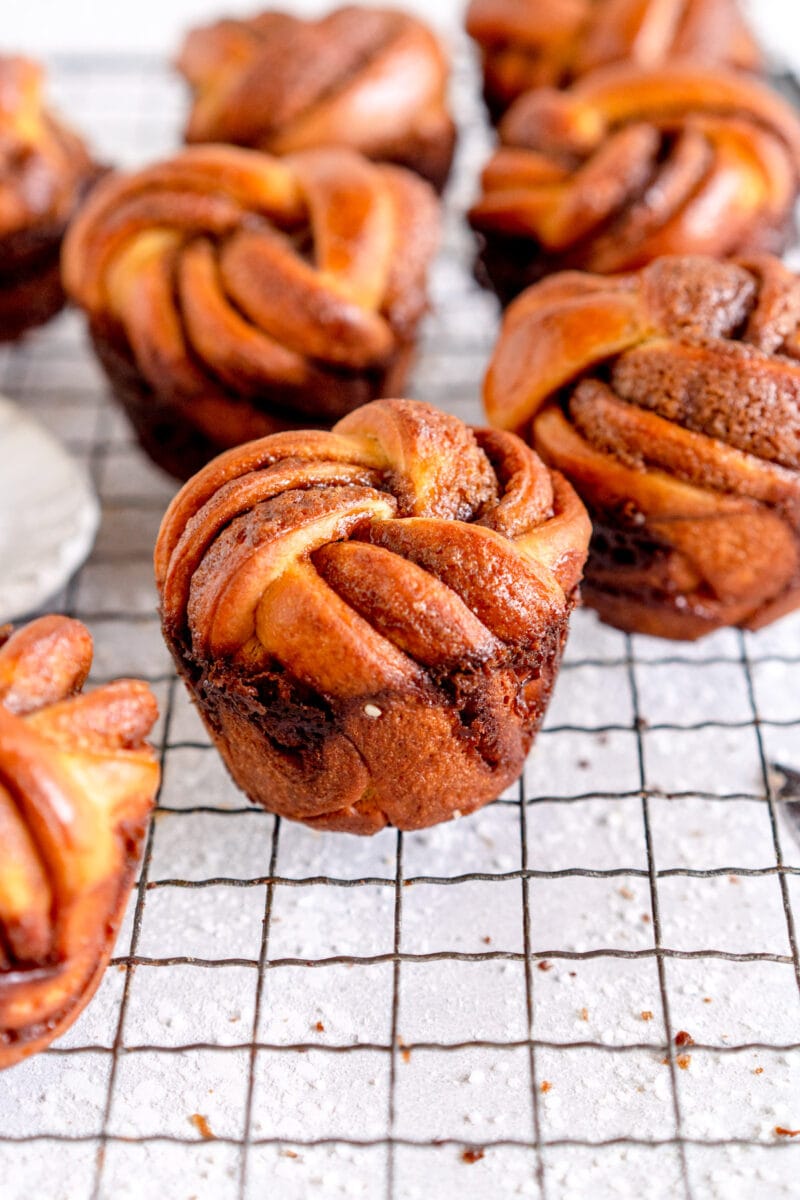
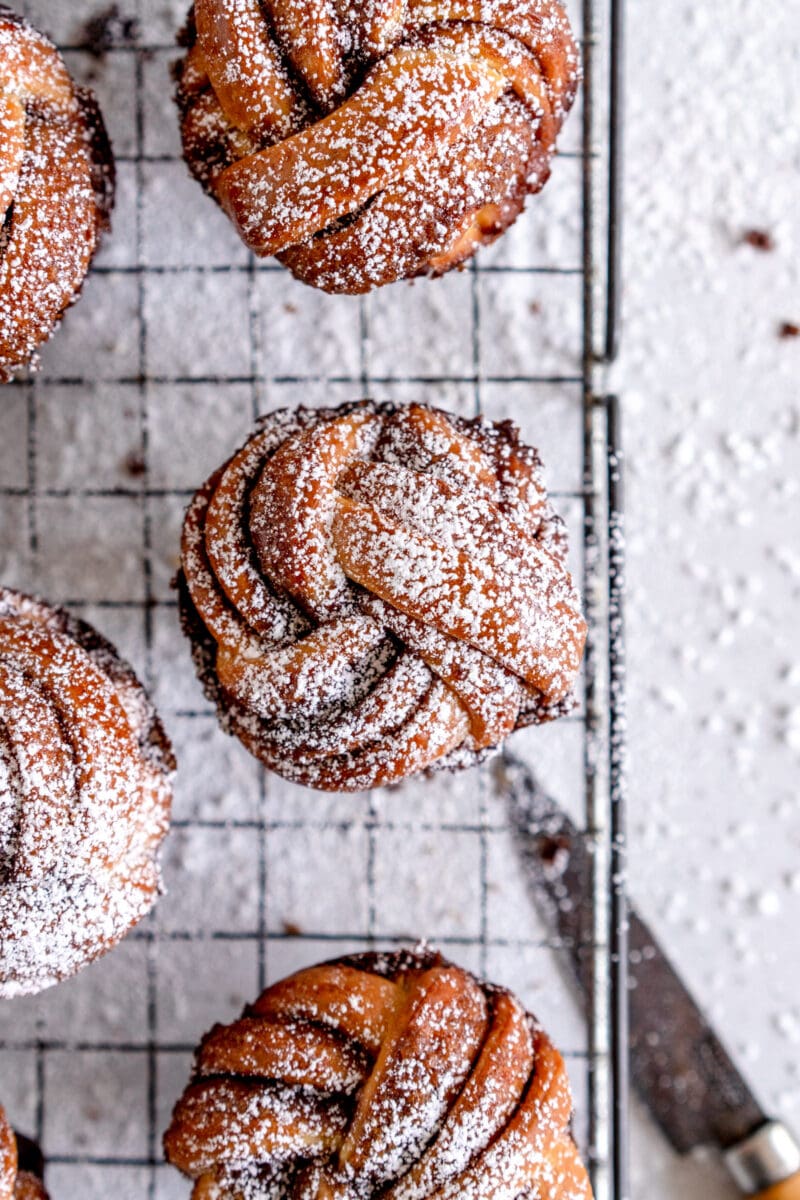
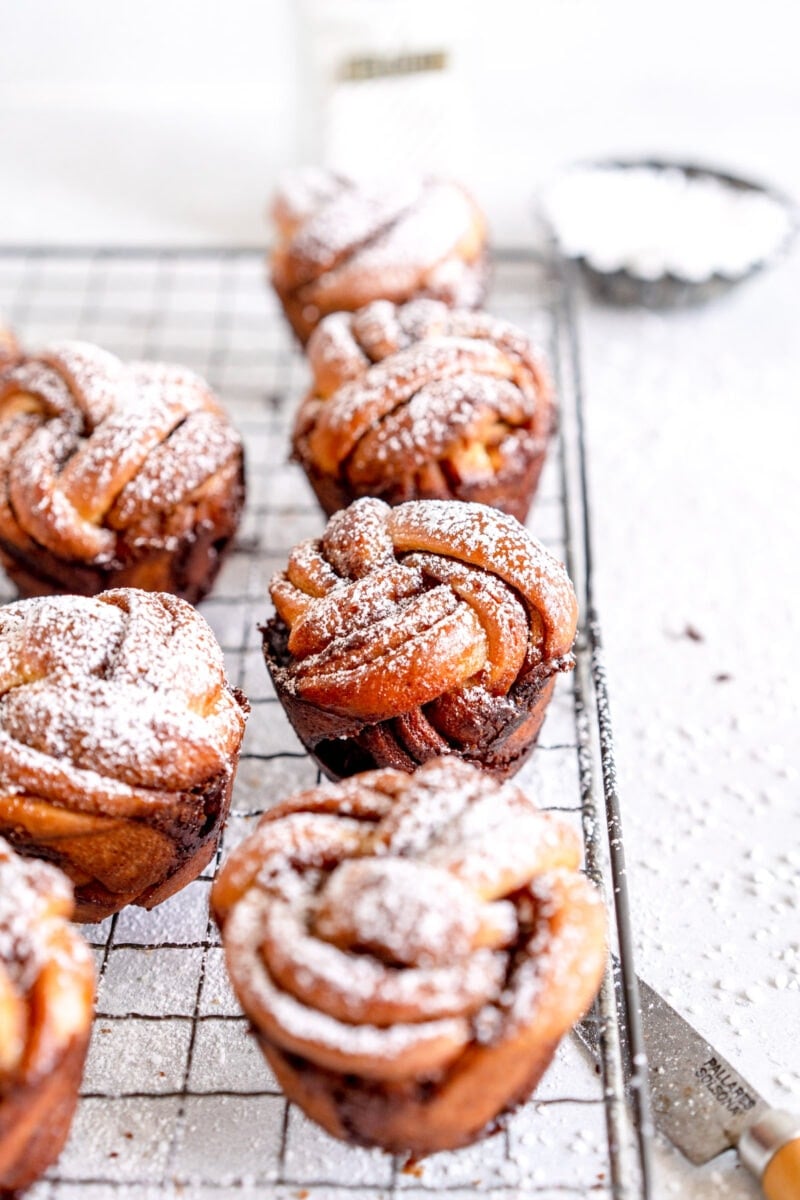
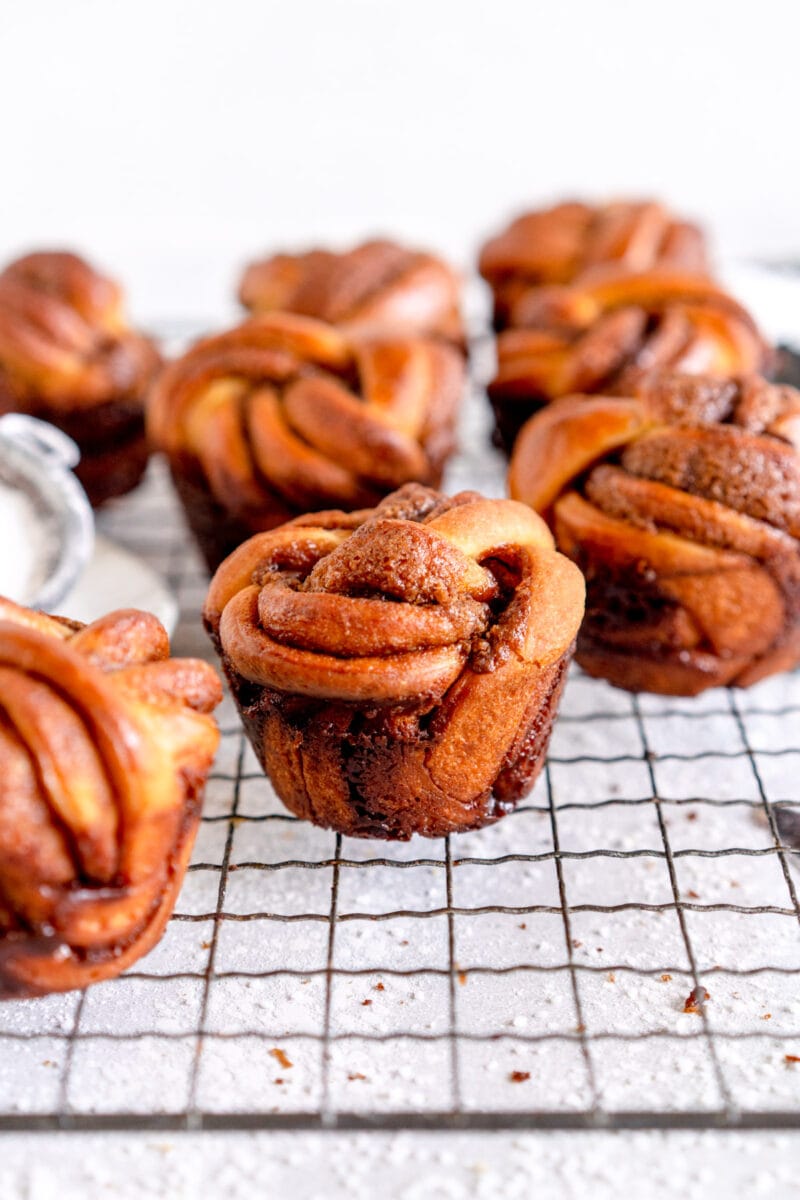
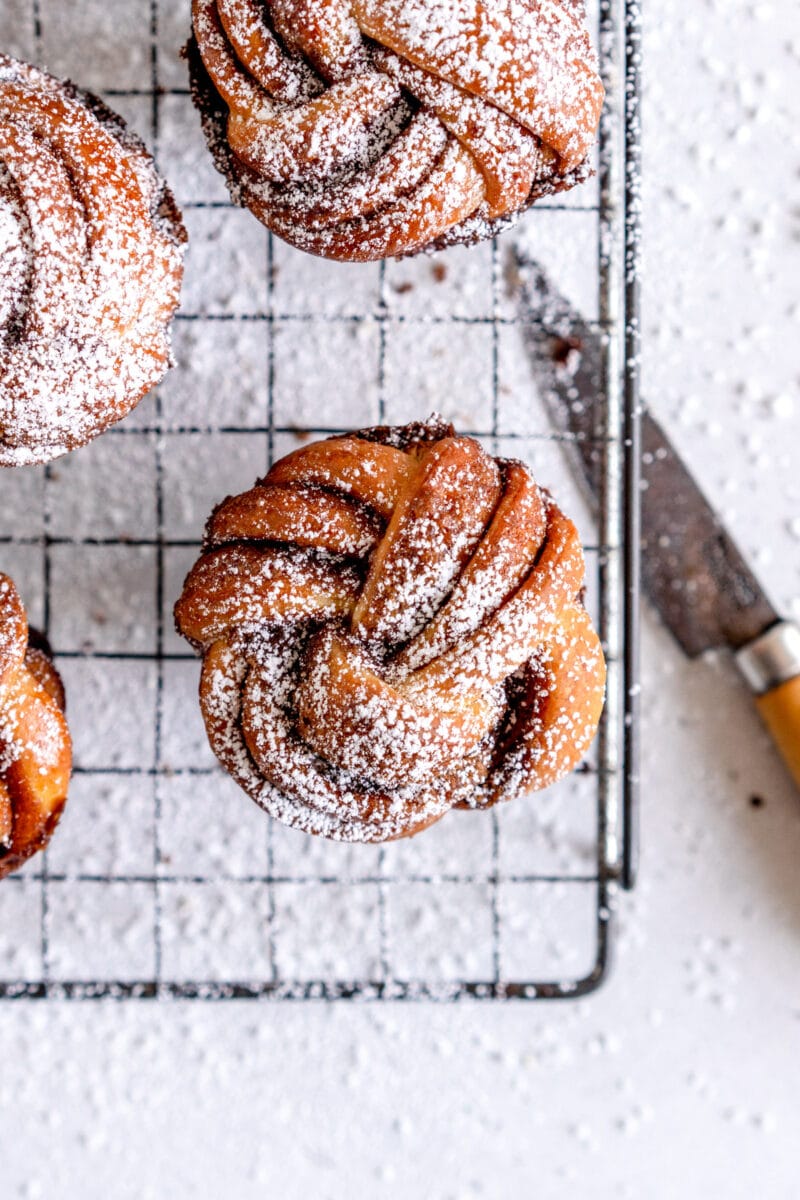
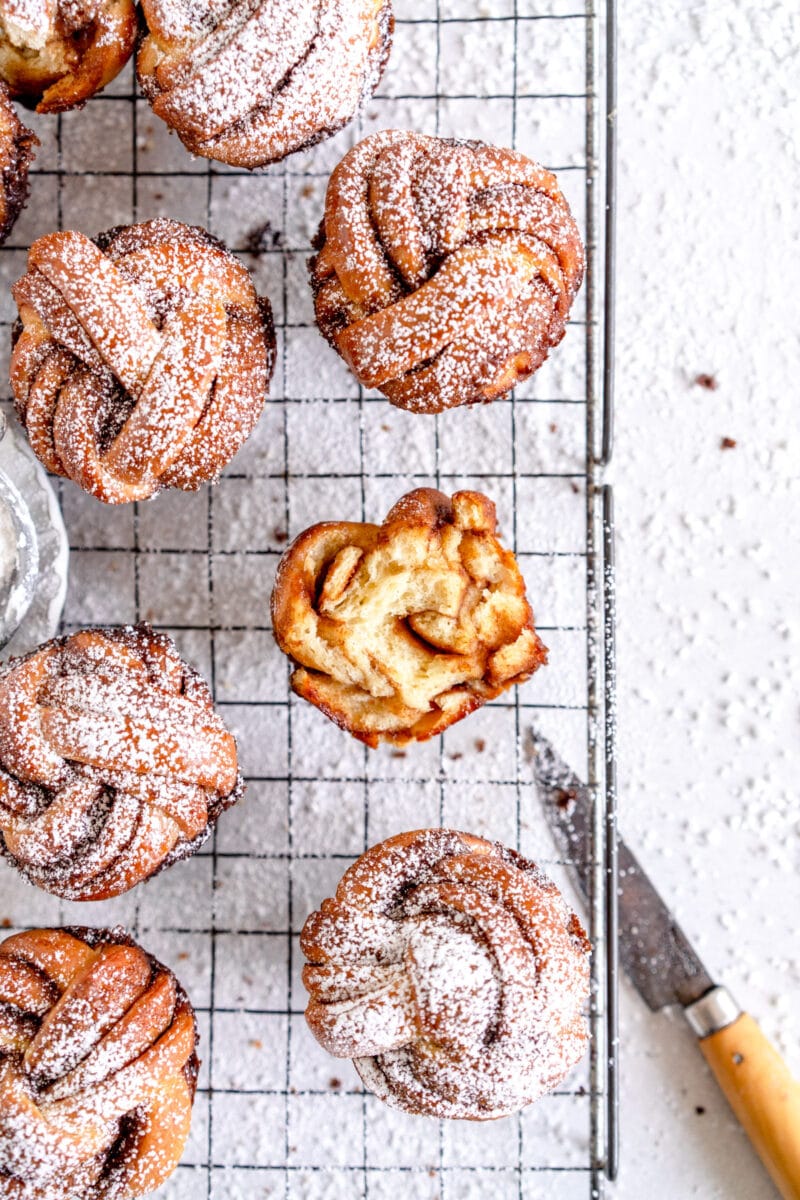
These Cinnamon Bun Twists are made with a small batch brioche recipe and do not need a mixer! These braided cinnamon buns are easy to make and have a soft dough and an easy cinnamon bun filling. They are made in a muffin pan for perfectly shaped cinnamon twists!
Cinnamon Twists
Hi hi! Just popping in to share the recipe for these Cinnamon Bun Twists with you! When I was working on my small batch no mixer brioche recipe, I wanted to try making a few thing with it to put it through its paces. There are still some small batch cinnamon rolls and doughnuts coming your way. However I wanted to see if it could hold up to being made into a twisty cinnamon bun and I am happy to report that it certainly can! These Cinnamon Bun Twists are much easier to make than they look. They are super soft and filled with a simple cinnamon bun filling. I finished them just with some powdered sugar, but you could also add some Swedish Pearl Sugar to them too if you like!
How to make Cinnamon Bun Twists
These Cinnamon Twist Buns have a few steps to them, but they are super easy to do.
- Make the dough. These twisted cinnamon buns are made with my small batch brioche recipe. You can either make this in a mixer, or you can do it by hand. The first rise is done in the fridge to help make the dough easier to roll out.
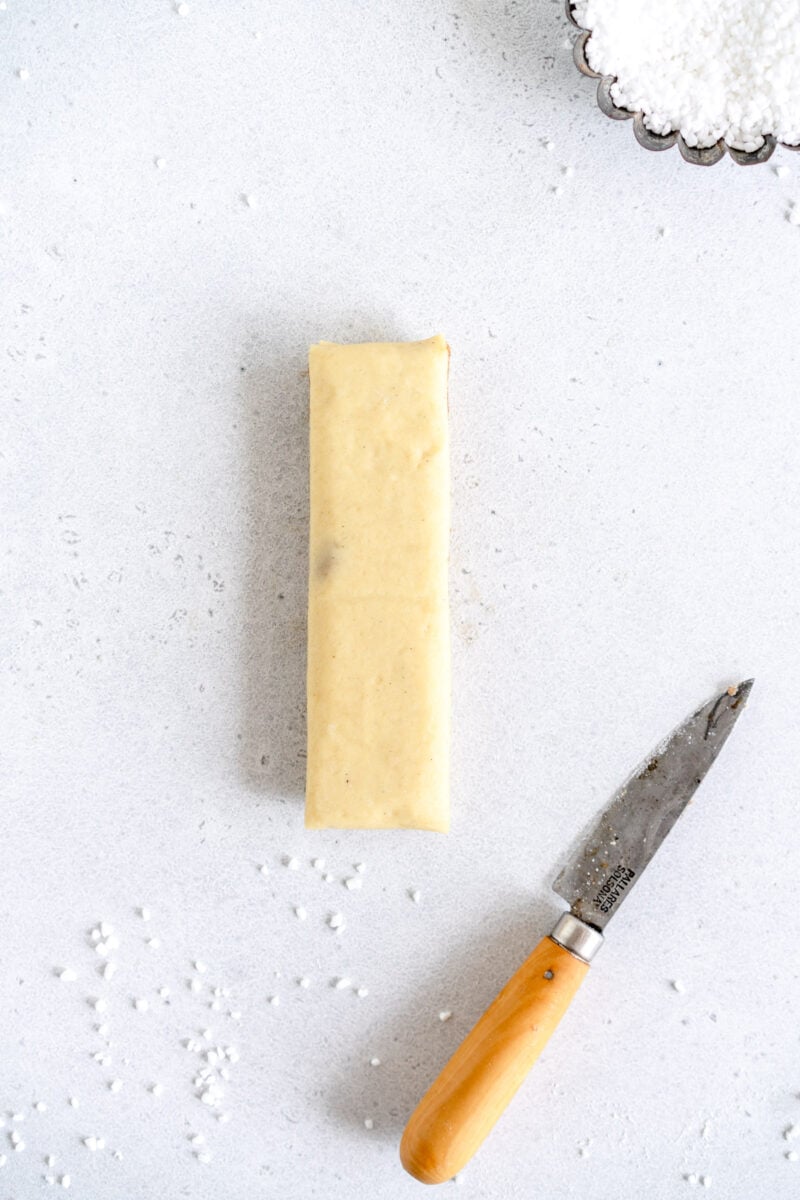
- Roll the dough out and spread with the filling. Fold the dough up into thirds (see video demonstrating this)
- Cut the dough into strips - you should get 8 strips from the dough, one for each bun. Chill the strips down.
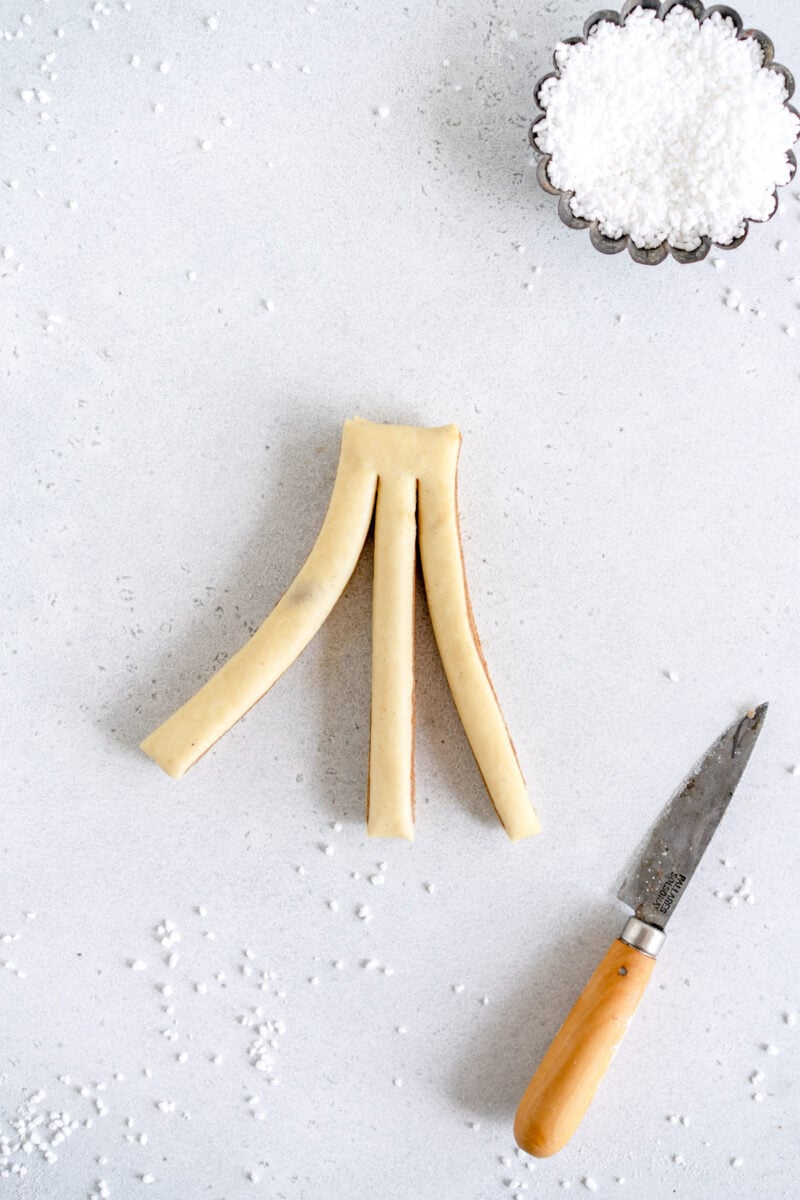
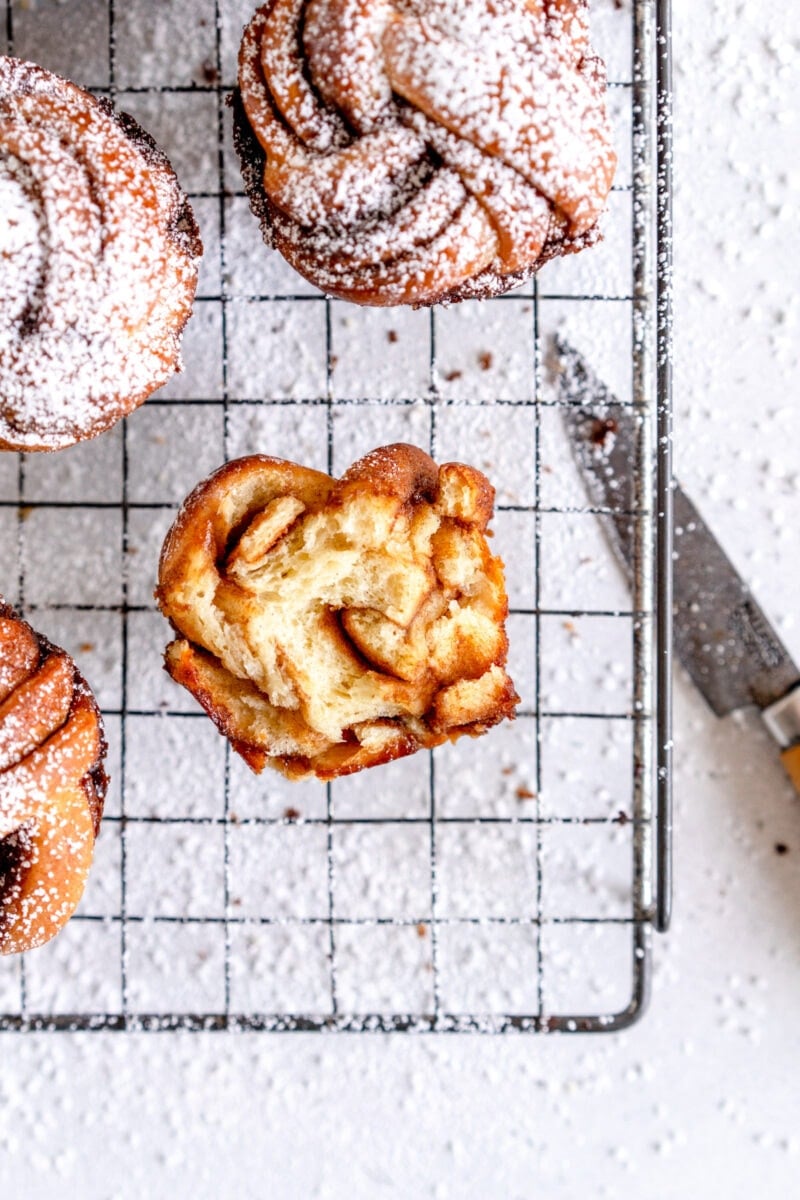
- Braid the buns. There is a better explanation of this further down the post. It's super simple but they look so, so good. I recommend starting with the wonkiest strip first just so you can use one to practice.
- Give the buns a second rise, then brush with egg wash and bake. This recipe is baked at 375°f / 190°c, a slightly higher temperature than other recipes, as the buns are only small.
- Finish with powdered sugar. You could add a sugar syrup here too if you wanted, or a glaze, but I love them plain.
No Mixer Small Batch Brioche
These buns use my small batch brioche. You can use a mixer for this if you like, but I wanted to develop a recipe for a brioche that can be made by hand. Not everyone has a mixer, and sometimes it's fun to do by hand too. I think that making bread by hand really gives you a good idea of how the dough is meant to look. It will get sloppy when you add the butter in but don't worry - it will come together.
- Combine dry ingredients - This brioche is pretty standard when it comes to ingredients. All-purpose flour, instant yeast, sugar, salt.
- Add wet ingredients - One egg, lightly beaten, and some milk goes in. The butter is incorporated later.
- Bring together - You want to develop some strength in the dough here. This kneading process will take about 8-10 minutes. Bring the dough together in your bowl then transfer to a work surface and work the dough until it is soft and smooth, and when you press lightly with your finger, the indentation springs back.
- Add the butter - The butter is added to the dough. This step will get super sloppy. Don't worry though. It will come together. Keep kneading and mixing until it comes together. Then give a few more minutes of mixing just to ensure it is mixed in. You want it to bounce back nicely when you press with a finger.
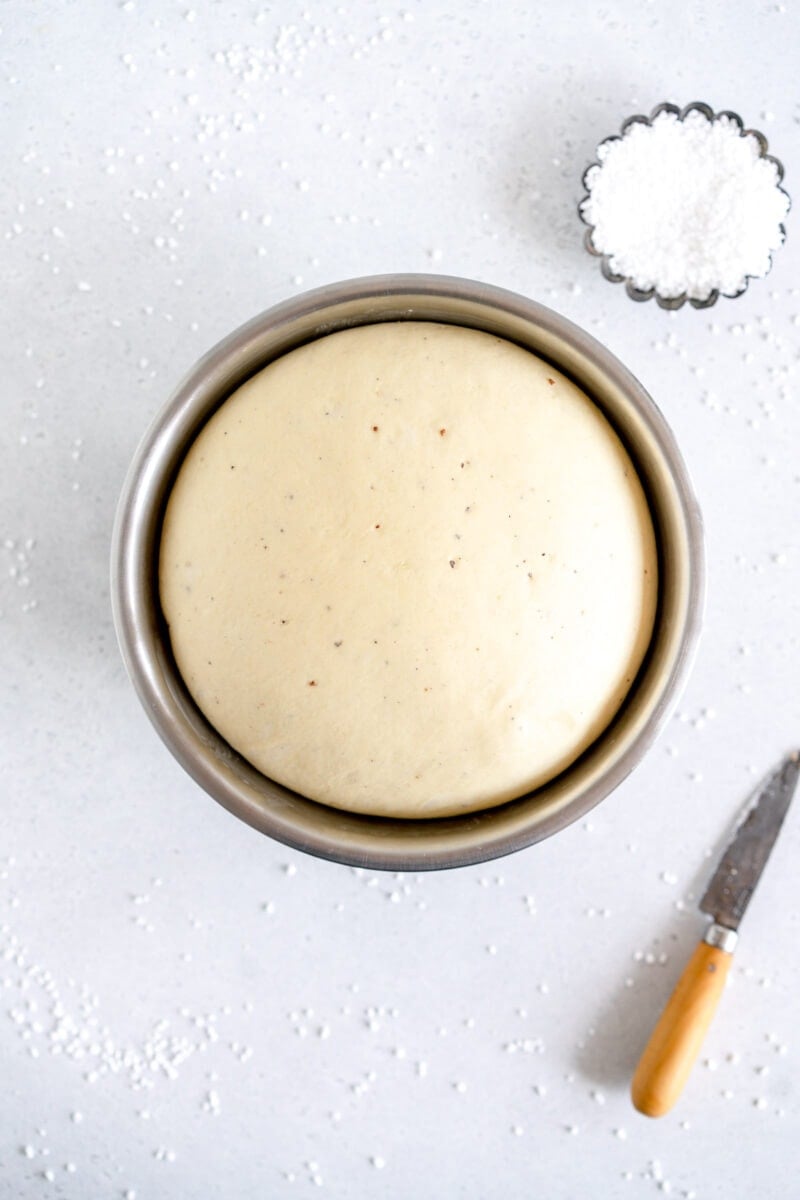
- Leave to rise - This dough for this purpose works best with a cold rise. I give it some time on the counter first to kick start the rise and then pop it into the fridge.
A plastic or metal bench scraper will be super helpful when you are incorporating the butter in. Just keep scraping up the excess butter and squishing it onto the dough. It will come together.
How to Twist Cinnamon Buns
The method for making these I got from Richard Bertinet, although I have seen it a few places before too. Basically you fold the dough up, cut strips, and braid them up. The braid then gets rolled up into a twisted cinnamon bun!
- Cut the folded dough into strips, each about 4cm wide. Chill the strips for 15 minutes or so to help firm them up.
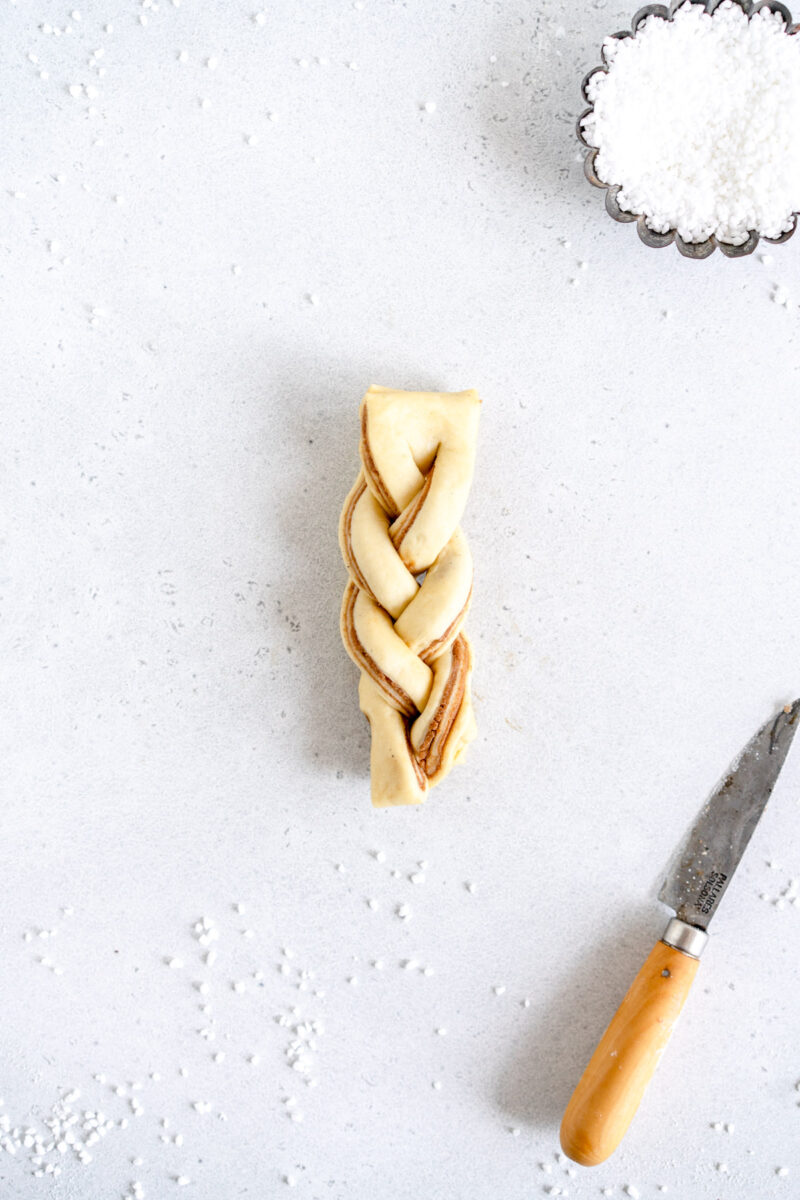
- Cut the dough into three strips, leaving one end (about 1cm worth) intact
- Braid the three strips until you have a single braid.
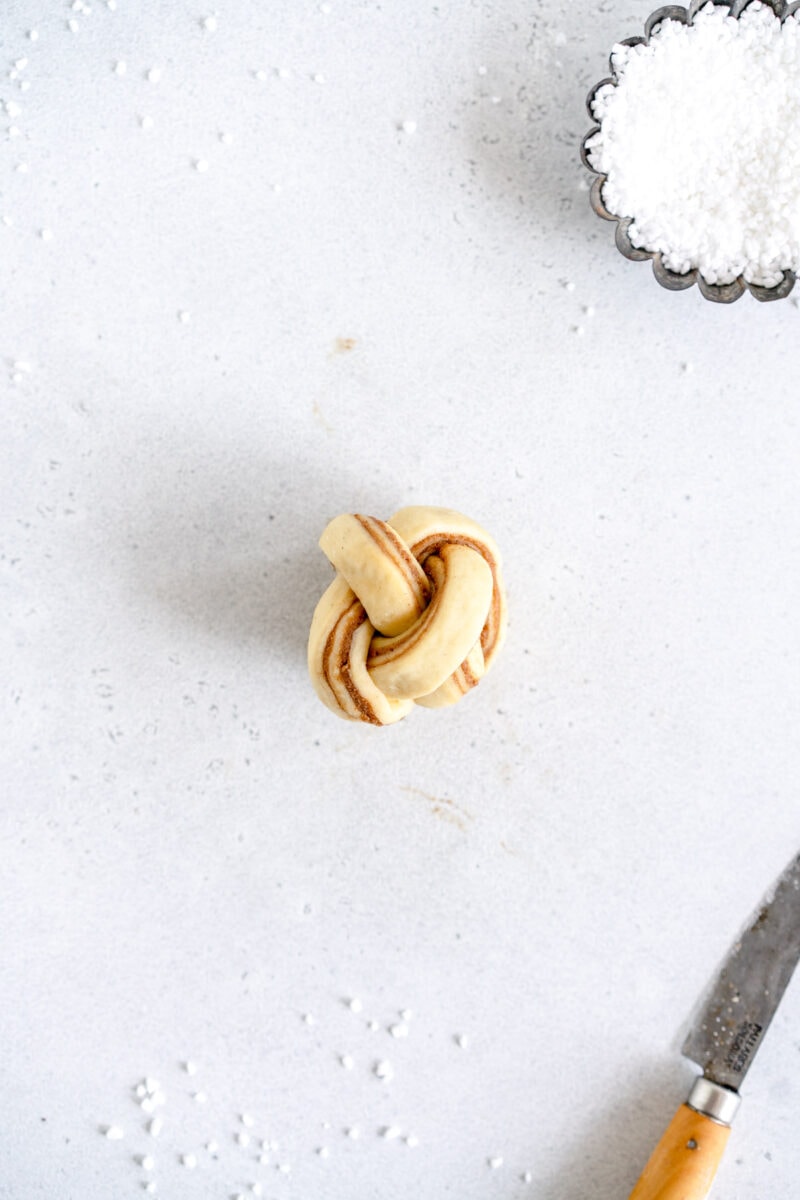
- Starting with the intact end, roll the braid up into a ball.
- Shape lightly if needed and then place in the muffin pan.
Tips to make dough ahead of time
There are a few ways that you can break up the workload when you are making brioche based things. The main one is to make your dough ahead of time. This Small Batch Brioche dough does well with an overnight cold rise. Rising the dough in the fridge slows down the rising process. This means you can leave it in the fridge until you are ready to bake it, rather than your schedule being dictated by when they dough is ready to be rolled out.
Working with cold dough is also significantly easier. Chilling the dough firms up the butter, making the dough a little firmer to work with but still pliable and easy to roll out. I find that starting with a cold dough means you can roll out dough much more evenly, and also get it thinner, making it easy to get the right sized rectangle of dough for making these cinnamon twisted buns.
This dough needs a minimum of 2 hours in the fridge to rise. Standing it on the counter to give it a little kick start helps a lot. I often make it a day ahead if I can. Ideally you do not want to leave it more than 24 hours in the fridge on the first rise, however I have left it longer before and it has been ok too.
How to roll out a nice even rectangle of dough
Rolling out a nice even rectangle of dough can be really tricky. I've been there. There are a few wee tricks though that can make it a little easier.
- Shape your dough into a rough rectangle. The dough will probably have somewhat of a round shape from being in a bowl. This is fine if you want round dough. However, if you start with a rectangle you are more likely to have a more even rectangle of dough when you roll out. Squish the dough into a rectangle shape. I like to use a bench scraper to make the sides nice and straight.
- Flatten your dough slightly with your rolling pin. If you start rolling straight away, the dough will roll out unevenly. Instead, flatten it lightly with your rolling pin. Press down on it a few times to flatten it, starting at the bottom and working your way up, then turn the dough 90 degrees and repeat the process again. What this does is gives you a larger flatter piece of dough to start rolling out, which is easier to keep an even thickness.
- Square off your rectangle as you go. As you are rolling out, pause a few times to square off the edges of your dough. Again, I like to use a bench scraper for this. It is easier to stop a few times and see what is happening than roll out all in one go and then try and fix any unevenness.
How to get a clean cut on cinnamon buns
Chilling the dough down once it has been cut into strips will help you get a nice clean cut on your dough. This gives both the dough and the filling a chance to firm up a little. I use the fridge but you can also use the freezer for about 5 minutes if you're in a rush.
Make sure that you wipe the blade of your knife between cuts too if needed.
Doubling this recipe
This recipe can easily be doubled. When it comes to rolling out, you can go about this two ways. You can either divide the dough into two and roll out two rectangles, or you can double one dimension of the dough and roll yourself out a 64x36cm rectangle. You want to keep the other dimension the same. When it comes to folding if you have doubled the dough, fold from the long end so you end up with a folded rectangle that measures 12cmx64cm.
Can these buns be made with other fillings?
Yes, you can fill these with whatever you like. However - remember that they need a lot of twisting, so you don't want to go with anything too slippery. I tried testing these with Nutella and it was a huge mess. If you wanted to use a chocolate filling, I would recommend my espresso chocolate babka filling (a half batch should work well). Make sure you chill the strips in the fridge to let the filling set up.
If you don't want to use cardamom in the filling you can also just replace it with cinnamon. You could also spread the dough with some room temperature butter then sprinkle it with some sugar which has had lemon zest and vanilla rubbed into it. Just don't use Nutella. Trust me on this one.
Frequently Asked Questions for Cinnamon Twists
Can this dough be made in the mixer?
Yep! Pop everything except for the butter into the mixer and mix for 10 min until the dough comes together and is smooth, then add butter and mix to incorporate then give it a further 5 minutes until the dough is smooth and elastic.
Can this recipe be made all in one day?
Yes. Ideally you want to start with chilled dough when you roll it out though. So give the dough 20 min on the counter then transfer to the fridge for about 2 hours to give it a chance to rise.
Do I have to chill the dough in the fridge?
You don't have to but you need to roll out the dough quite thin before spreading with the filling. It's much much easier to do this with chilled dough. Skip that step if you want but you've been warned.
Can these be finished another way?
Yes! You can do whatever you like here. They would be delicious sprinkled with some Swedish pearl sugar before they go in the oven, or you could glaze them babka style with a sugar syrup as soon as they come out. I just used powdered sugar, but these would also be good with a simple icing.
For more Small Batch recipes, check out:
❤️ Made this recipe and love it? ❤️
I would LOVE for you to leave me a review and star rating below to let me know how you liked it! Also, please make sure to tag me on Instagram!
Answers to your baking questions
Over the years, many of you have asked me questions about:
- baking in grams
- adjusting oven temperatures
- what kind of salt to use
- and many more!
I've curated and answered them all for your easy reference in this frequently asked questions post!
Recipe For Cinnamon Bun Twists
Print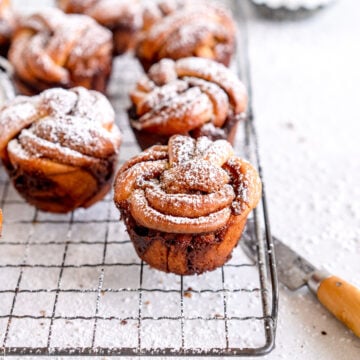
Cinnamon Bun Twists
- Prep Time: 2 hours
- Cook Time: 30 minutes
- Total Time: 2 hours 30 minutes
- Yield: 8 buns 1x
- Category: Cinnamon Buns
- Method: Baking
- Cuisine: American
Description
These Cinnamon Bun Twists are made with a small batch brioche recipe and do not need a mixer! These braided cinnamon buns are easy to make and have a soft dough and an easy cinnamon bun filling. They are made in a muffin pan for perfectly shaped cinnamon twists!
Ingredients
Brioche Dough
- 290g all-purpose flour
- 30g granulated sugar
- 1 tsp (3.1g) instant yeast
- ½ tsp ground cardamom (optional)
- ½ tsp (2g) salt
- 120g whole milk
- 1 tsp vanilla
- 1 large egg (60g), lightly whisked
- 60g unsalted butter, at room temperature
Cinnamon Cardamom Filling
- 70g unsalted butter, at room temperature
- 105g light or dark brown sugar
- 1 tbsp all-purpose flour
- 2 tsp ground cinnamon
- 2 tsp ground cardamom
- Pinch of salt
Egg wash - 1 egg beaten with 1 tbsp water
Powdered sugar to finish, optional
Instructions
BRIOCHE DOUGH
- Combine the ingredients. Place all ingredients except for the butter into a medium bowl. Bring together into a rough dough, then turn out onto a work surface (do not add more flour). Knead the dough for 8-10 minutes. It will start off as very rough, then will come together and become smooth and elastic, and when pressed lightly with a finger, the dough should spring back slightly.
- Add the butter to the dough. Flatten the dough out into a rough rectangle and add the butter to the surface of the dough. This part will get sloppy, so make sure that you have a bench scraper nearby. Incorporate the butter into the dough by squeezing it and kneading it in. Keep scraping any excess butter back onto the dough and kneading it in. Don’t freak out. It will all work together. Once the butter has incorporated into the dough, knead for a further 2-3 minutes.
- Leave dough to rise. Shape the dough into a ball and then transfer to a lightly buttered bowl. Cover with plastic wrap. Leave to sit on the counter for about 20 minutes to kick start the rising process, then transfer to the fridge to rise for at least two hours, and up to overnight.
ASSEMBLY
- Make the filling. Combine all filling ingredients in a bowl and mix until well incorporated. Grease a muffin pan with melted butter and a brush - you need 8 holes of the pan filled. If you are worried about the buns sticking, you can place a small piece of parchment paper into the cup of each pan to help with removal. I like to leave a gap between rolls where I can - with 8 holes in a 12 cup muffin pan there will be some with rolls next to each other.
- Roll out the dough. Turn the chilled dough out onto a lightly floured surface. Shape into a rectangle by patting down and squaring off the edges with a bench scraper. Starting with the dough in a rectangle means you are more likely to get a nice even rectangle of dough when you roll it out. Roll the dough to a rectangle that is 32x36cm (12.5 x 14 inches).
- Add the filling. Spread the dough evenly with the filling using an offset spatula. Take it right to the edges.
- Fold up the dough. Holding one of the SHORT ends of the dough, fold the dough into thirds like you would a business letter. To do this, take one end and fold it to ⅔ of the way across, then fold the other third over it. (see video at top of post for demonstration). You should now have a rectangle of dough that is 12cm (4.7 inches) wide and 32 cm long. Pat the rectangle of dough out gently just to make sure there are no air bubbles.
- Cut into strips. Arrange the dough so one of the short sides is facing you. Cut the dough into 8 strips, each 4cm (1.5") wide (so you will be left with 8 strips each measuring 4x12cm / 1.5x4.7". Place the strip of dough onto a parchment paper lined sheet pan, cover lightly with plastic wrap, and chill in the fridge for 15 minutes. This helps firm up the dough and set the filling, and makes the next step a little cleaner.
- Shape the cinnamon buns. Remove the dough from the fridge. Working with one piece of dough at a time, cut the strip of dough into 3 pieces, leaving an end intact (see images). Braid the strips of dough together to form a single braid. Starting with the clean joined end, roll the whole braid up into a ball. Place into one of the cavities of the muffin pan. Repeat the process with the remaining strips of dough until you have 8 buns. Cover the pan lightly with plastic wrap, and leave in a warm spot until the buns are puffy and when pressed lightly with a finger, the dough an indentation is left that slowly springs back, about 45 minutes to an hour.
BAKING
- Prepare the buns for baking. Toward the end of the rising period for the buns, preheat the oven to 375°f / 190°c. Remove the plastic wrap from the risen buns, and brush the tops with egg wash, being careful not to drip too much down the sides or brush too much of the filling onto the dough.
- Bake the buns. Bake the buns for 15-20 minutes, until they are golden brown. If you like, you can measure the temperature of the buns with a probe thermometer inserted into the dough. Fully baked dough reads at about 190°f / 90°c. Remove the buns from the oven and transfer them to a wire rack soon after removing them, so that they do not stick to the pan. Leave to cool on the wire rack. Dust with powdered sugar and serve.
Store leftovers in an airtight container at room temperature. You can rewarm briefly in the microwave if you like.
Notes
Twisting method from Richard Bertinet
Comments
Leanne says
Hi Erin next time you are making these could you leave a video of how it looks after the 20min rise and once ithe dough comes out of the fridge? Mine looks like a rock 😫.
Erin Clarkson says
Yep it's pretty firm!
Gisselle says
Wow, truly had to trust the process on this one for me, especially while adding in the butter (I know you reassured us but I still freaked out a bit haha). This was my first time making brioche, working in grams, and fairly new to bread in general... and the end result was absolutely delicious! I did struggle with cutting the strips within the strips - almost like they needed to stay in the fridge beyond 15 min to be more firm? The layers of the strips were getting messy/not cutting easily, then made it hard to braid. Not the prettiest but tasted perfect. I can't wait to keep making these!
Erin Clarkson says
Did you do the first rise in the fridge? If it was warm where you are it might have warmed up a little and they may need a tiny bit more in the fridge if you feel like they need it! 🙂
Emi says
Can I use bread flour instead of all purpose?
Erin Clarkson says
you can but the dough may be a little tougher!
Anu says
I made these a few times before and they came out great but I forgot to let it proof on the counter 20 mins before putting it in the fridge overnight.. will my dough be all right:? Do I proof it more in the morning?
maddie huey says
These turned out so cute!!
Erin Clarkson says
They look so, so good!
Sus Jenkin says
Making these has given me the confidence to give any baking recipe a go. They look so beautiful and taste delicious. I was unsure when I added the butter, but it all came together in the end just like Erin says. I don't have stand mixer so this was the perfect recipe for me.
Erin a question please - if keeping these for a few days do you recommend fridge then quick microwave to warm & soften, or are they ok at room temp for 3 or 4 days? Cheers.
Erin Clarkson says
Hi! You can store them how you like but I always re warm in the microwave!
NM says
This looks so good - is it possible to make 4 servings by halving the ingredients please? Thanks!
Erin Clarkson says
Hi! yep you can scale however you like 🙂
Franchesca says
These are so pretty!! Going to make them tomorrow for sure! Question-have you ever just baked them off on a sheet pan? Wondering if they would keep their braid if so. I might just try it!
Erin Clarkson says
I haven't sorry but you could try!
Imara says
Hey, I’m trying to make these to share with my family tonight and I’m having some trouble with the dough!
I have no baking experience and this is my second try at this recipe. The first time the dough was lumpy and didn’t incorporate nicely, it ended up pretty stiff and when I baked them they were too hard, not soft and fluffy. Almost the texture as if they were stale not freshly baked. This second time around I’ve tried to do things with much more care and attention and it seems better but my dough is still not as soft and smooth as your images/videos look. I left the dough overnight and it rose really well but the top layer of the dough is kind of dry rather than soft with moisture. If you have any tips for how I could get the dough to mix better/ why it might be a bit dry/ harder id greatly appreciate it!
Erin Clarkson says
Hi! It looks good - it would have jujst maybe gotten a skin on it overnight. Did you use the tin foil on it, or plastic wrap? Tin foil means things can still dry out a little!
Sophie says
Hi, I made this recipe and the end result was great. However, I had to add some either more flour or less liquid as using the recipe quantities ended with an extremely sticky, stiff batter like consistency.
I’m not blaming this recipe as I have had similar issues with other recipes in the past.
I’m in the UK and was wondering if maybe specific to the type of wheat grown in Europe. Any ideas?
After adjusting, they came out great 👍🏽
I’m really looking forward to trying some of your other recipes.
Erin Clarkson says
Hi, yep different flours can be more or less absorbent / stronger so need more or less liquid. If you're having an issue definitely try using a wee bit more flour as needed. Make sure you're using the correct kind of flour too 🙂
Dorothea says
I just made these and they turned out great!! Question, can I use this dough and make regular cinnamon rolls?
Erin Clarkson says
Hi, yep it's the same dough I use for my cinnamon rolls - check my small batch cinnamon roll!