
Basic Apple Pie - Sweet and tart apples are finely sliced, tossed with some flour and vanilla bean paste, then nestled inside a super easy homemade pie crust and topped with a lattice and baked to perfection. This is the perfect fall pie, with a pie crust that is very quick and very easy to make - it is basically foolproof.
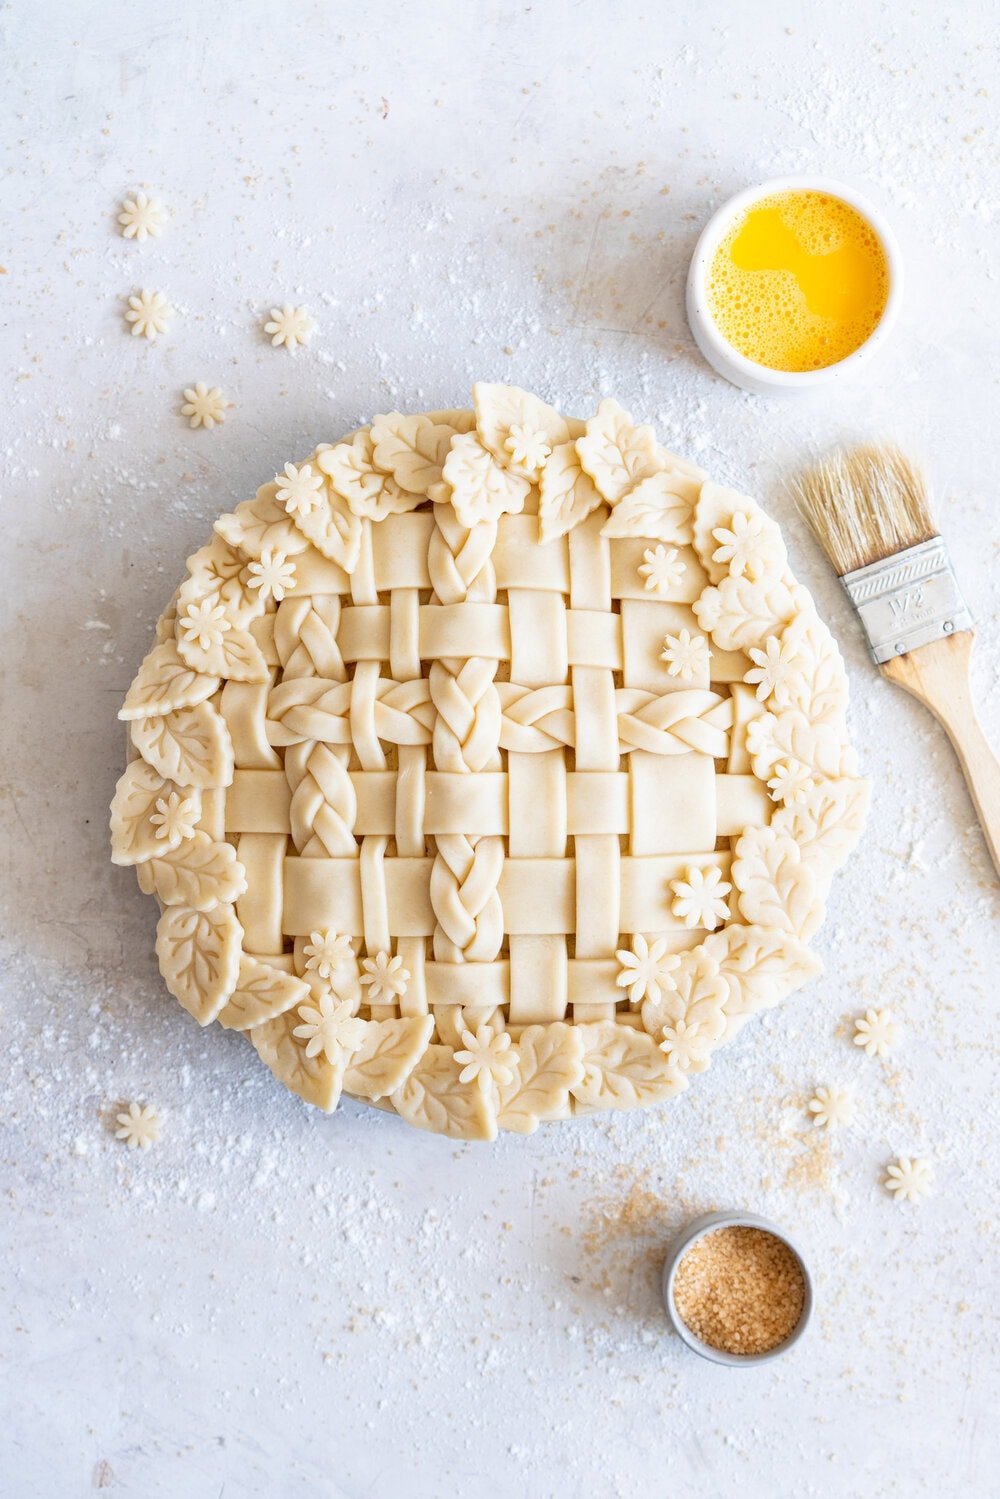
Table of contents
Basic Apple Pie recipe
Hi hi! Just popping in to share this recipe for a 'basic' apple pie. There are a fair few fun and fancy apple pie recipes on Cloudy Kitchen but this is basic one that I go back to time and time again. It has an easy homemade pie crust recipe, and is filled with slices of fresh apple. It's basic, but a classic, and I just love it so much. There really is nothing better than a good homemade apple pie.
I made this when Nz Chef Josh Emett and his lovely wife Helen were in NYC, promoting Josh’s new book, ‘The Recipe’. It’s a collection of recipes from top chefs around the world - all the recipes look incredible, and the photography is so, so beautiful. Josh has some amazing restaurants back home in NZ, and does an incredible cooking segment on his IG stories, so we decided to join forces and make something together - an epic apple pie! My teeny NYC kitchen is a far cry from Josh’s insane kitchen back in Auckland, but we made it work!
Easy Homemade Pie Crust
I use a little tip that my baking bestie Erin Mcdowell taught me - to laminate my pie dough after making it but before rolling it out for use. What this does it pops a few layers within the pie dough. This makes it homogenous and easy to work with but also still nice and flaky. So you get the best of both worlds - flaky AF pie dough which is super easy to work with. Here's how you do this:
- Make your pie dough - For this recipe I make the dough then form it into a rectangle. Then I wrap tightly in plastic and chill for only an hour. This gives the butter time to chill down enough that it won't melt everywhere when you roll it out.
- Roll out and perform turn 1 - Roll the dough into a large rectangle on a lightly floured surface. Then brush off any excess flour and perform a letter fold - where you fold it like a business letter.
- Perform turns 2 and 3 - Repeat the process again two more times. Your dough should be super homogenous at this point!
- Divide and shape - At this point I split the dough in two and shape each into a disc rather than roll out and laminate each piece individually. Works much better. If you're using it for a lattice top, shape into a rectangle. Starting with the shape you are wanting to achieve makes rolling out much easier! I like to divide the pie dough into ⅓ and ⅔ - shape the smaller one into a disc as it will be your bottom crust, and shape the top into a rectangle so it’s the right shape when it comes to cutting out lattices.
- Chill again - Either chill your dough for at least 2 hours or overnight, or freeze for another time.
The Best Apples to use for Apple Pie
I love to use a mixture of apples to make apple pie. We used three - Mutsu, Honeycrisp and another green variety. The variation in flavour and texture makes for a super delicious pie - go for something a little sweeter, and something a little more tart. If you’re in NZ, a mixture of Braeburn and Gala would be great. Braeburn hold their shape nicely in the oven and provide the tartness, and gala is more sweet.
You want to ‘shingle’ in the apples when you are adding them to the pie, in order to have as few gaps as possible. Apples cook down in the oven, so layering them tightly ensures that they bake evenly.
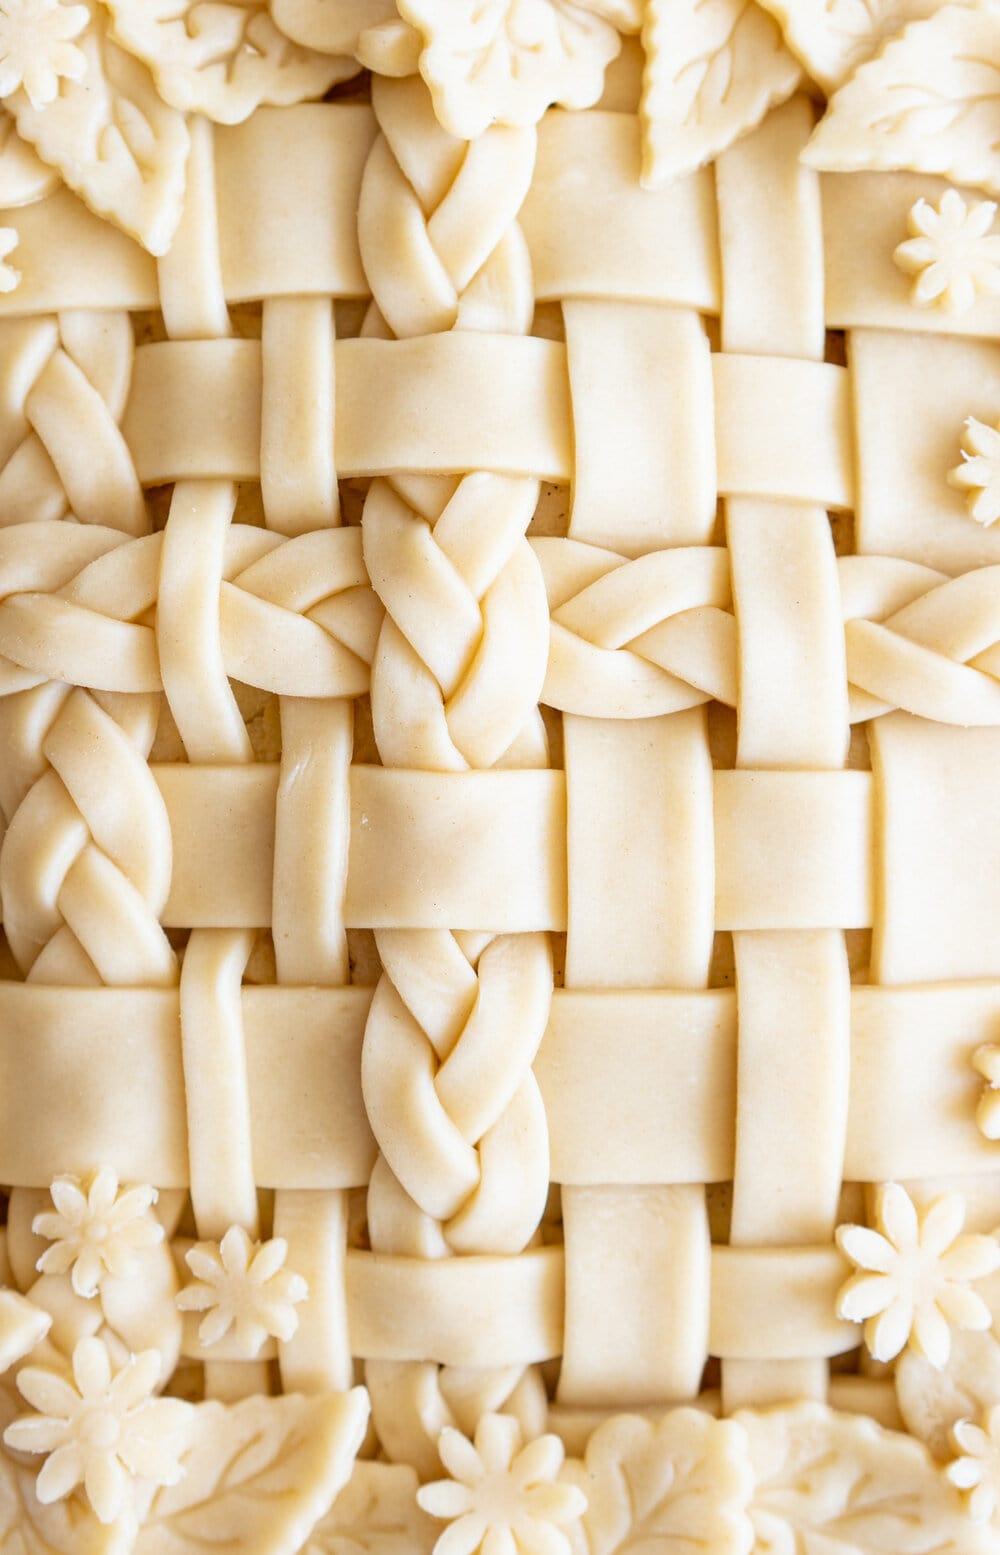
How to lattice an apple pie
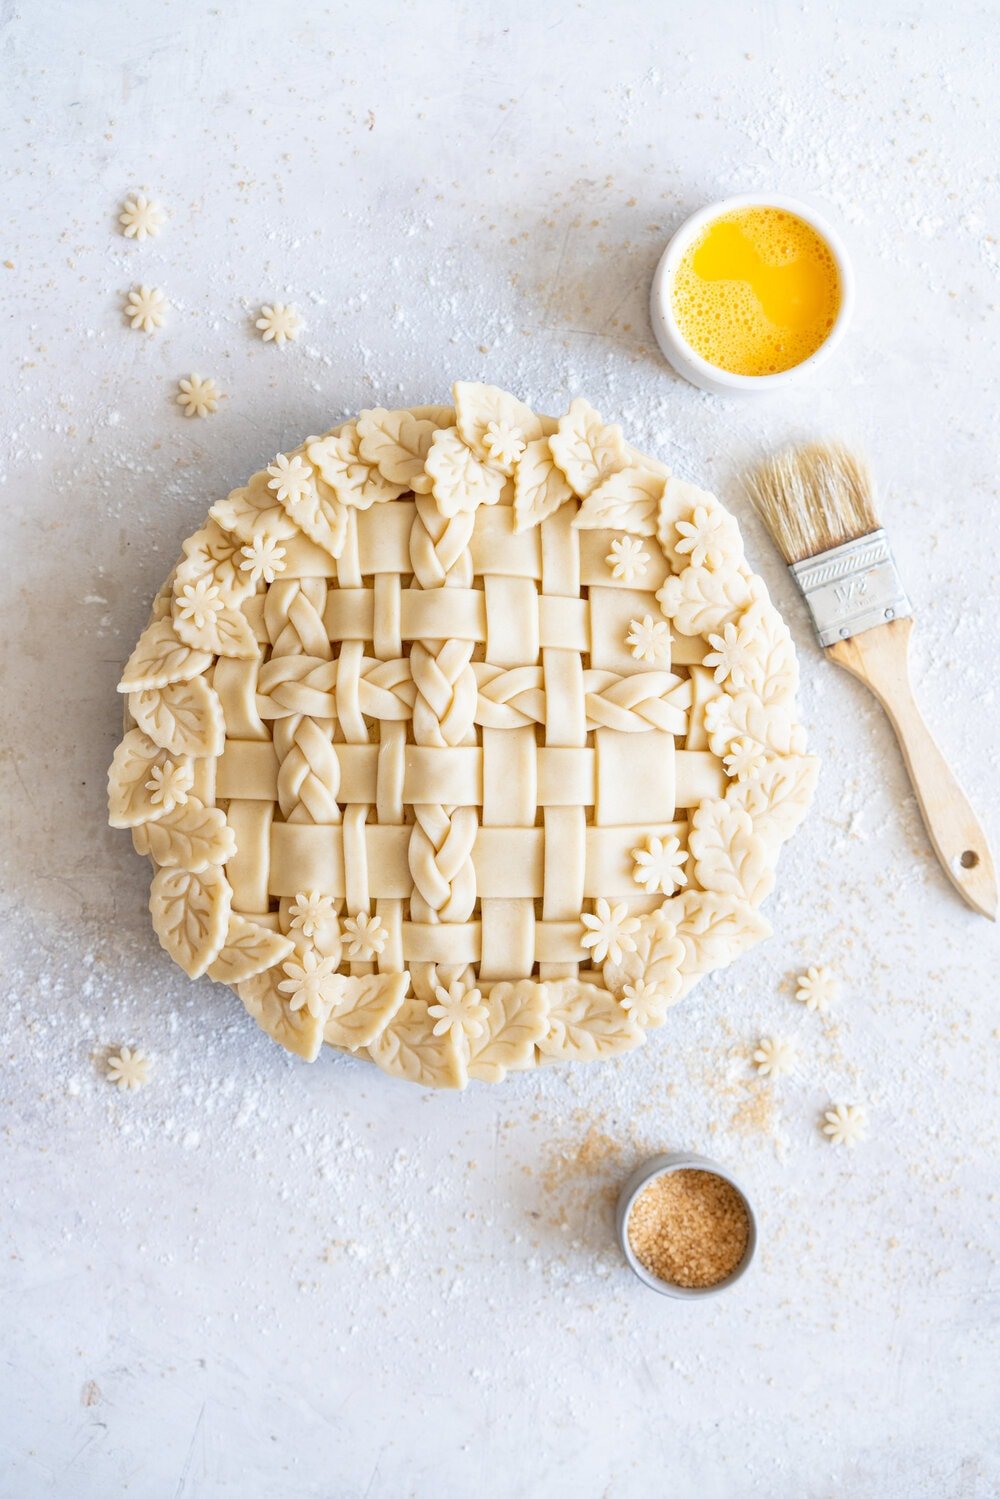
It is no surprise that I am a touch extra when it comes to finishing pies. I love making a really beautiful, fancy lattice, and spending time making cut outs and things to add to the top. The quantity of dough in the recipe accounts for that - if you do not want to do a fancy topping and want to keep it simple, you can make a regular batch of dough such as the one in this recipe.
We used pie stamps to cut out the shapes for the edge of the pie - I have collected a whole bunch over the years - I have this set and this set of leaves, and then this set is where the flowers are from. I think I also have this set! I also love a plain lattice made with a pastry cutter and a ruler - you do you here and do whatever you like!
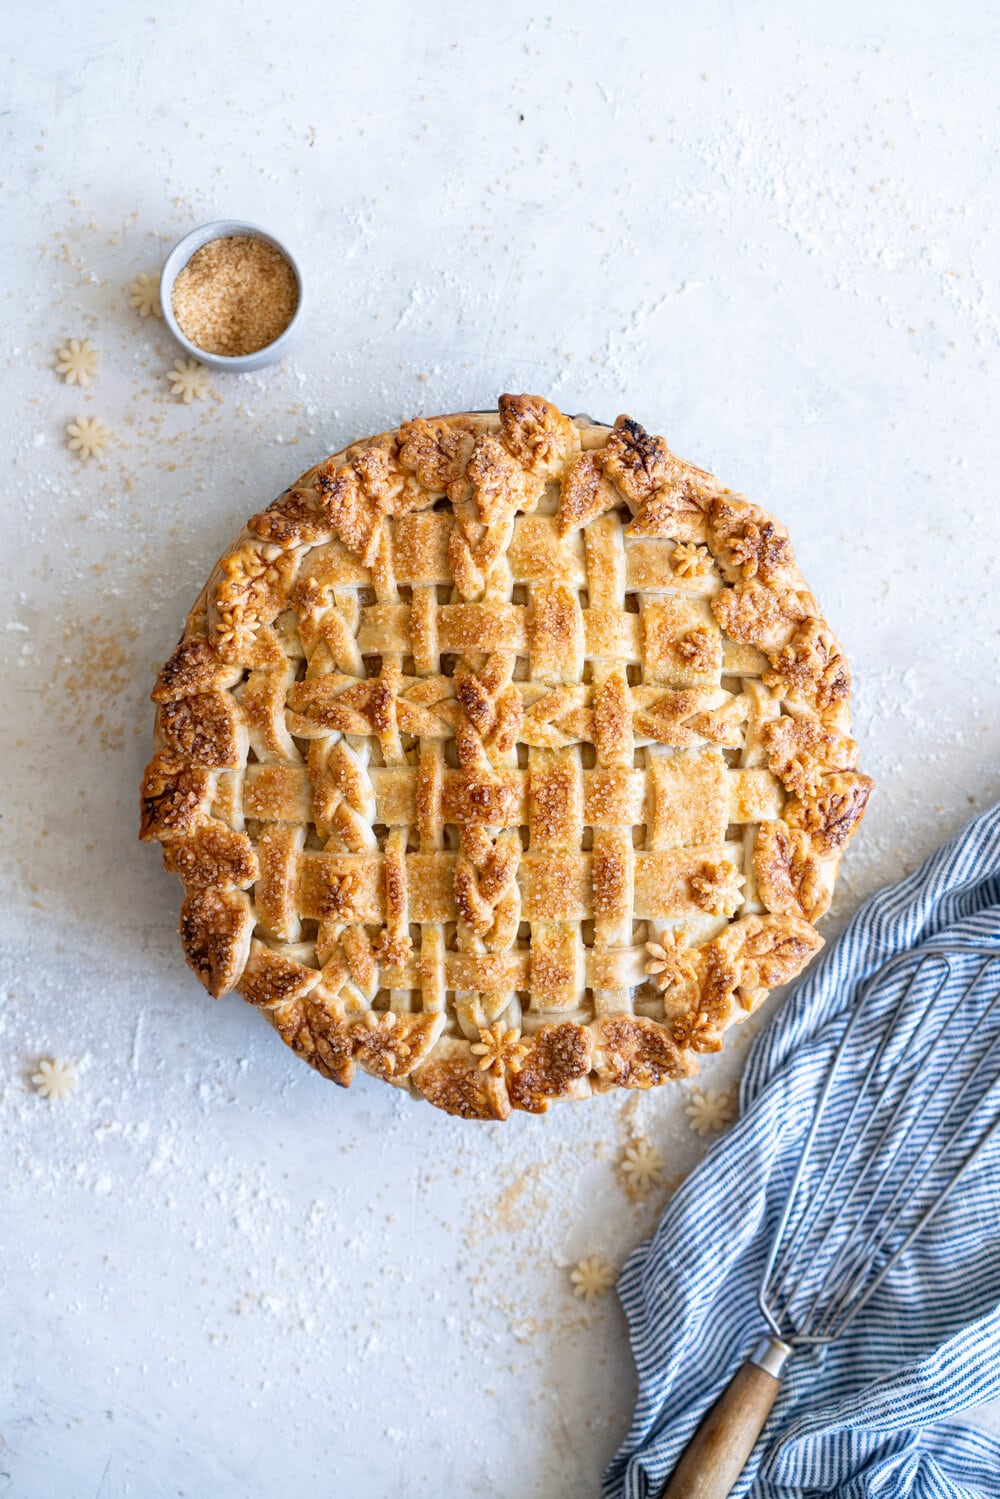
The importance of a good bake for a pie
Often people worry about getting a soggy bottom on their apple pie and lots of the time it is because the pie is not baked well enough. Pies, particularly double crusted pies such as this apple pie that does not have a par bake, require a really good bake to ensure that they are properly done.
Don't be afraid to bake this pie until it is deep golden brown. If you are worried about the crust looking too done, you can tent it with foil while the filling finishes off. You want to be able to see the filling bubbling through to know that it is done.
For more recipes with Apples, Check out:
- Apple Slab Pie
- Apple and Cardamom Pie with Cardamom and Vanilla Bean Crust
- Laminated Cinnamon Buns with Apple
- Apple Crumble
❤️ Made this recipe and love it? ❤️
I would LOVE for you to leave me a review and star rating below to let me know how you liked it! Also, please make sure to tag me on Instagram!
Answers to your baking questions
Over the years, many of you have asked me questions about:
- baking in grams
- adjusting oven temperatures
- what kind of salt to use
- and many more!
I've curated and answered them all for your easy reference in this frequently asked questions post!
"Basic" Apple Pie
- Prep Time: 1 hour
- Cook Time: 1 hour 15 minutes
- Total Time: 2 hours 15 minutes
- Yield: One 9" pie - Serves 8 1x
- Category: Pie
- Cuisine: American
Description
Basic Apple Pie - Sweet and tart apples are finely sliced, tossed with some flour and vanilla bean paste, then nestled inside a super easy pie crust and topped with a lattice and baked to perfection. This is the perfect fall pie, with a pie crust that is very quick and very easy to make - it is basically foolproof.
Ingredients
Pie Dough
- 540g All-purpose Flour
- Pinch of Salt
- 1 Tbsp (13g) sugar
- 345g cold unsalted butter, cut into cubes
- 1 cup (240ml) cold water
- 1 cup ice
- 60g (¼ cup) Apple cider vinegar
Filling
- 1.5kg apples, peeled and thinly sliced (yields about 1200g sliced apple)
- 1 tsp vanilla bean paste
- 45g all-purpose flour
- 85g raw sugar (increase this to taste if needed)
- big pinch of salt
- Egg wash - 1 egg whisked with 1 Tbsp water
- Raw sugar to finish
Instructions
PIE DOUGH
- Place flour, sugar and salt into a large bowl. Cut butter into chunks, and add to the flour. Toss lightly to coat.
- Working quickly, using a pastry blender or your fingers, cut the butter into the flour mixture until there are only large pea-sized chunks left. You want a few lumps of butter remaining to keep the pastry nice and tender.
- Combine ice, water and cider vinegar in a bowl. Sprinkle a few tablespoons of the ice water into the flour and butter mixture, and using a stiff spatula or your hands, mix in well. Continue adding water a tablespoon at a time ( I usually start with about 180g liquid, mix that in, then go from there and add additional liquid as needed) until you have a dough that holds together well, but is not too wet.
- Squeeze together with your fingertips to make a homogenous dough. Shape into a rectangle, Rest in the fridge for one hour.
- Roll out the dough on a floured surface into a rectangle, fold it in thirds like a letter, then roll again and repeat the folding. Repeat this process one more time. Divide the dough into two pieces, one larger than the other. Shape the smaller one into a disc and the larger into a rectangle. Rewrap tightly in plastic, and rest for at least two hours, or preferably overnight, before using.
FILLING AND ASSEMBLY
- On a lightly floured surface, roll the disc into a circle slightly larger than your pie dish. You want it to be approximately ⅛ inch (3mm) in thickness. Line a 9" pie dish, leaving the extra dough overhanging. Trim the dough so there is about 1 inch overlapping the edge of your dish. Place in the fridge while you prepare the filling and lattice.
- Roll out the second piece of dough (the rectangle) into a rough rectangle approximately ⅛ inch thick. Use a pastry cutter to cut strips for your lattice. If you would like to make a braid, roll a piece of pie dough into a long thin rectangle, cut thin strips, and braid.
- Place your strips and braids onto a parchment paper lined baking sheet and store in the fridge until ready to use. Press together the scraps and re-roll, these are good for extra lattice strips or for using pie stamps to cut out for the border - freeze for 10 minutes or so before stamping out to help the stamps hold their shape.
- Place the sliced apples in a large bowl. Add the vanilla bean paste. Combine the flour, sugar, and salt in a small bowl, then add to the apples and toss well to combine. Transfer the filling to the lined pie dish a little at a time, packing the slices of apple in tightly, and mounding in the middle. Remember that it will bake down a little, so it is ok for the pie to seem a bit full.
- Arrange the strips of pie dough on the top of the pie, weaving into your desired lattice. If you are adding stamps, trim any overlapping pie dough and lattice strips so that they are flush with the edge of the pie dish, then glue on the stamps with a little egg wash. If you are crimping, trim the crust with a little overhang and then crimp as desired.
- Rest the pie in the fridge for at least 30 minutes. While the pie is resting in the fridge, preheat the oven to 425°f/ 220°c. Place a baking tray on the bottom rack of the oven.
- Brush the pie with egg wash, and sprinkle liberally with raw sugar. Bake at 425˚f / 220˚c for 20 minutes, or until the pastry is set and beginning to go golden. Reduce the temperature 375°f / 190°c, and bake until the pastry is deeply golden and the filling is bubbling, 40 to 50 minutes.
- Remove from the oven and cool on a wire rack. Serve warm or at room temperature, ideally with a scoop of ice cream.
- Store leftovers wrapped in foil at room temperature and re-warm slightly when serving.
Comments
michael dixon says
This was so helpful, you are the boom . I would like to try these they’re so wonderful
Erin says
You are so welcome!
Nicole says
I made this apple pie over the weekend. It was amazing! I still have some left and I can’t stop eating it. This was my first time making pie crust from scratch and you made it so easy to follow along!
Erin says
Hi! Ahhhh yay I am so glad that you liked it! I also made it over the weekend! 🙂
Erica C says
Hi I’m going to try the pie this weekend. Do you cook the pie crust before you fill it. Or you fill and then bake?
Erin says
Hi! Yay! Nope you don't bake it first, you just make it as written - no par-baking with this one!
Erica C says
Also, 540 grams translates to 2.25 cups of flour? I got different conversions Thank you
Erin says
I make this by weight. Typically 'my' cup of measured flour weighs 150g so conversions will be different. If you take 1 cup as 150g, this will be 3 2/3 cups. I really suggest investing in a kitchen scale though! Happy to recommend one if you need.
Erica C. says
I’ll have a scale and I will try it. Thank you.
PantaOz says
Something is definitely wrong with this recipe... 540 gr flour with 240 ml water plus one cup of ice... I got the pancake dough - not apple pie crust! So angry that I followed this recipe. Wanted to try something new... and regretted it!
Erin says
Hi! Did you read the method part of the recipe? You don't add all of the water and you don't add any of the ice - you only add enough to form a dough. I usually need about 3/4 cup of the ice water. The recipe reads - Continue adding water a tablespoon at a time ( I normally need about 1/2 to 3/4 cup, but add slowly) until you have a dough that holds together well, but is not too wet. There is a video at the top of the post which shows me making the dough if that is helpful to see the process 🙂
Chloe says
Hi, I was wondering if I can make this a day ahead and then bake it the next day. If not, is the dough fine if I make it a day ahead?
Erin says
Hi! yep, you can! You can also make the dough up to 3 days ahead and chill it, or freeze for up to a month!
Emily says
To say this crust is foolproof is an understatement (if you follow the method that is). I come from an Amish and Mennonite family and let me tell you - they know pie. But this crust has been the most amazing to work with! I also love how easily you can adapt it. I will say, I prefer my apple pie with a crumb top but regardless I’ll be using this pie crust for all of my pies!
My mom rolled her eyes at me when I told her we need to stop using measuring cups and work with a scale but she’s totally converted now!
Erin says
Holy crap this is the ultimate compliment! The pie crust is my fave tooooo! I also love an apple crumb pie - there's one on the site that I am making tomorrow! x
Mia Turner (Australia) says
This recipe is perfect! For those of you who got it wrong, you didn't read the instructions nor watched the video.
Thank you for sharing this with us.
stacy says
Pastry worked perfectly! Thanks for always writing with such perfect detail. 🙂
Mayanka Khetarpal says
Hi Erin,
I'm a little confused if I want to keep my pie dough in the fridge overnight , should I do the letter fold and then keep it overnight ?
Also you mentioned that after you make the dough it needs to be in the fridge for an hour and then do the letter fold.
Can you help me a little here?
Thank you so much,
Mayanka
Erin says
Hi! Yep you make the dough, rest for an hour, then do the fold, then rest again overnight and you can use it the next day! The letter fold always happens an hour after, the second rest period can be at least 2 hours or overnight, or you can freeze it from there!
Debra says
Erin,
Can you send this in ounces instead of grams?
Would love it...
Thks D
Erin says
Hi, I don't have it in ounces sorry. You are welcome to convert it via google but I don't have the conversions as I only test in grams. If you mean weight ounces, you should be able to hit the 'unit' button on your scale 🙂
Gabby says
I can't wait to try this method for making pie crust! Just out of curiosity, what does the apple cider vinegar do in the pie crust? I've never used it!
Erin says
Hi! It tenderises it 🙂
Michaela says
Made this last night. Followed the recipe to the letter. The best!!
Delainey Ruiz says
Do you bake the pie on top of the preheated baking pan on the bottom rack of the oven? I’m going to make this for Thanksgiving! Thanks!
Erin Clarkson says
So sorry a bunch of my comments got lost in limbo! I hope it turned out ok! Yep I do it on the bottom to start off!
Courtni Shafer says
Such an amazing pie crust- and pie! All of Erin’s recipes are GREAT!
Erin Clarkson says
Eee thank you! So happy you loved
DL says
It was my first time making apple pie this thanksgiving, and your recipe is the best! I loved the way you’ve designed the lattice. Thank you for all the detailed notes. I usually like my desserts less sweet, so I’ve cut the sugar in half and it still tasted delicious. Everyone loved the pie and how it looked!
AWong says
My absolute fave to cook and gift every year to friends and family. I'm a bit behind this year and I'm wondering, is it possible to fill and lattice the pies, fridge to bake the day after or will the apples make the base soggy? TIA!
Erin Clarkson says
Hi! It should be ok! You can also bake the day before!
Alice says
Love love love this recipe!
It’s such a lovely dough and the lamination tip works a treat! Because of this I was wondering if the pie dough could be used for a savoury pie? What do you think? 🙂
Kassie says
Rested my dough overnight, used 5 honeycrisp & 1 Granny Smith apple, a deep dish 9” pie dish, added cinnamon and a bit of lemon juice. It took about an hour to bake in my oven. Came out perfect with flaky buttery crust. Saving this one 🙂
Joanne Sundeen says
Does using a ceramic pie dish make a difference in baking time? Also I saw from another reply that you start the pie on the bottom rack and then move it to the middle? Is that correct?
Erin Clarkson says
I Yes, it may take a little more time. I usually keep it on the bottom rack but you can move it if you like!
Kate says
My family loved this pie at Thanksgiving! I was nervous trying a lattice top for the first time but knew Erin wouldn’t steer me wrong. And no soggy bottom - woo hoo!
julia says
Thanks so much for this recipe! I really appreciate the accurate numbers for all ingredients - it really makes this recipe foolproof. This one in particular i trusted instantly, because i have made a rhubarb galette with your recipe before! Well, it’s now my favorite apple pie recipe. I had a 22cm pie dish, which is a little bit smaller than 9 inches, but I have used the leftover filling and dough to make hand pies 😳🫶 Also it was my first time making the lattice, I am now looking forward to mastering this skill in the future. Thanks again 🤍
Jaime-Anne says
I didn’t think I could make pastry till I followed this recipe. It turned out so flaky yet sturdy enough to hold the yummy apple filling.
Great instructions as always.
Breanna says
I could have sworn that you had a recipe with cooked apple filling before baking. Did the recipe change?
Erin Clarkson says
I do but it is down at the moment while I re-work it into a couple of different stand-alone posts, it will hopefully be back up next week!
Breanna says
Thanks so much, it was the best apple pie I've ever made and I'm tasked with the apple pie for thanksgiving and would love to make that specific recipe!
Catherine says
Delicious and so easy. We ran out of metal pie plates, so couldn't do the 30min chill after the pie was assembled, less risk cracking the ceramic pan. But chilled the dough extra and it all worked out! The liberal egg wash made it look amazing. Lots of compliments both on the crust and the pie.
Lou says
I feel like this is the recipe you should use if you’ve never made a pie before! Every part of it was just such a joy and you explained it so well, I even felt like the laminating part was so easy and so much fun! It turned out so well and everyone loved it 🥰 thank you so much Erin!
Emily says
Love this recipe! I made it twice over the Christmas period ❤️
Lucy says
Finally! A pie that doesn’t have a soggy bottom and I could actually lift it out of the pan! I’ve never had the guts to lift a pie out, instead serving straight from the pan, but this one I knew I could trust! Thank you! Goodbye all other apple pie recipes! Absolutely delicious x
Sally says
Hi Erin! I made this yesterday and your pastry is amazing. The filling is so fruity! I enjoy it more than the filling of apple hand pies which was more molasses-y flavoured (all my guests liked this one more). One question for help. I followed the recipe to the tea but the top burnt. I mean it was delicious so we still ate it, but advice?
Erin Clarkson says
Hi, this looks like an issue with your oven! If you find the pie is browning too much on the top you can cover it with foil
Carm says
Hi Erin! I’m thinking about making this pie crust for Canadian thanksgiving this month (Oct 14) and I just had a question about baking it. I would normally bake in a glass pie dish, but as I am planning on baking some additional pies to give to aunts and uncles, would there be any baking time modifications or anything I should look out for if I bake the apple pie with this crust in an aluminium pie dish? TYSM.
Erin Clarkson says
Hi, I always use a metal pie pan! I don't like glass 🙂
Sommer says
I tried this recipe for my first attempt at a traditional apple pie for Thanksgiving this year, and it turned out amazing! Anything but basic. 🍏💕 My family and I loved it, thank you Erin!