Description
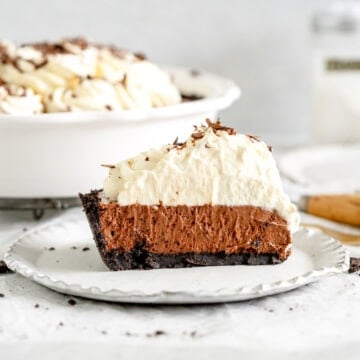
French Silk Pie is a super silky chocolate pie, made with an Oreo Crust (with an option for a classic pie crust), a creamy rich chocolate filling, and topped with fresh whipped cream. This is the perfect make-ahead dessert, and contains no raw eggs, unlike other French Silk Pie recipes!
Ingredients
Pie Crust
- One Homemade Oreo Crust, baked and cooled
French Silk Pie Filling
- 320g heavy whipping cream (for whipping for the filling)
- ½ tsp vanilla bean paste or extract
- 1/2 tsp salt (I use kosher salt, if you are using table salt, use less)
- 200g dark chocolate, broken into chunks (I used 72%)
- 80g egg yolks, cold from the fridge is fine
- 130g caster sugar or granulated sugar
- 20g water
- 90g heavy whipping cream, cold (for streaming into the filling)
Whipped Cream Topping
- 360g heavy whipping cream, cold
- 1/2 tsp vanilla bean paste or vanilla extract
- Chocolate shavings or cocoa powder to finish (optional)
Instructions
- In the bowl of a stand mixer fitted with the whisk attachment, whip the 320g cream, vanilla, and salt until stiff peaks form. Transfer to another bowl and store in the fridge until ready to use. Wash and dry your stand mixer bowl. Alternatively this can be done with a hand mixer in multiple bowls so you don't have to transfer.
- Set up a double boiler situation - place a small pot filled with an inch or two over water and bring to a boil. Break the chocolate into a glass or metal bowl that fits over the pot, and place on top, letting the heat melt the chocolate. Stir frequently. Once all of the chocolate is melted, remove from the double boiler and set aside to cool.
- In another metal or glass bowl, or in the bowl of your stand mixer (I used the metal bowl of my kitchen aid), combine the egg yolks, sugar and water, whisking well to combine. Place over your pot of simmering water, ensuring that the water does not touch the bottom of the bowl, and, whisking constantly, heat until the mixture registers 160˚f / 70˚c on a candy thermometer. Remove the bowl from the heat, and then whip the egg yolk mixture for 4-5 minutes, until it has increased significantly in volume, and cooled to room temperature. With the mixer on low, slowly add the melted dark chocolate, mixing until incorporated and scraping down the sides as needed. The mix may look like it has seized here but don't worry, the liquid cream will sort this out.
- Slowly stream in the 90g heavy whipping cream, mixing until well combined.
- Remove the whipped cream from the fridge, and add the chocolate mixture to the cream. Gently fold it in, taking care not to deflate the cream too much, until well combined and homogenous in colour.
- Scrape the filling into the pie crust, and smooth down with an offset spatula. Transfer to the fridge and chill for at least 4 hours, or up to overnight.
- To finish the pie, whip 360g heavy whipping cream with the vanilla until stiff peaks, then transfer to a piping bag fitted with a star tip (I used ateco #825). Pipe swirls of whipped cream on top of the pie. Alternatively, you can dollop the cream on and spread with an offset spatula. Finish with curls of chocolate made with a vegetable peeler, and chopped hazelnuts.
Notes
Heavy whipping cream is the kind of liquid cream that you use to make homemade whipped cream. In New Zealand it is the only kind you can get but I know other countries have different kinds, which is why I have specified!
80g of egg yolks is about 6 eggs worth, however eggs vary from country to country so the most accurate way is to measure them with a scale.
The previous version of this recipe had Nutella - there are notes in the body of the post on how to include Nutella.