Description
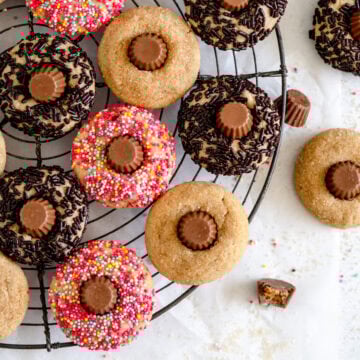
These super easy soft and chewy peanut butter blossom cookies are fun to make and come together quickly (or the dough stores well for making ahead) I top mine with Peanut Butter Cups, but chocolate kisses work great too! Roll your peanut butter blossoms in sugar for a crunch, or sprinkles for a cute festive twist.
Ingredients
- 130g unsalted butter, cold from the fridge is fine
- 80g granulated sugar
- 80g brown sugar (light or dark is fine)
- 130g smooth peanut butter (not natural)
- 1 large egg (50g not including the shell), at room temperature
- 1 tsp vanilla bean paste or extract
- 155g All-Purpose Flour
- ½ tsp (3g) kosher salt
- ½ tsp baking soda
- Turbinado / demerara sugar or sprinkles for rolling the cookies
- Mini Peanut Butter Cups or Hershey's Kisses for pressing onto the cookies (recipe makes about 28 cookies)
Instructions
- Preheat the oven to 330°f / 165°c. Line two sheet pans with parchment paper. If you want to make sure that the chocolate you are putting into the middle of the cookies doesn’t melt, unwrap and place into the freezer while the cookies bake.
- Place the butter in a medium saucepan, and place over medium heat. Cook until the butter has melted, then continue cooking, stirring with a whisk, until the butter foams and turns golden brown and nutty - this should take about 3-4 minutes. Turn the heat down if you are worried it is going too fast - a good way to know that it is getting close is that it will start making much less noise as the butter boils.
- Weigh out 100g (see notes section below) of the brown butter into a medium bowl and leave it to sit for 10-15 minutes so that it does not scramble your eggs. To speed up this process, swirl the bowl often, or you can place the bowl in a larger bowl of cold water and whisk the butter frequently until it cools.
- Add the granulated sugar, brown sugar, peanut butter, egg, and vanilla to the bowl. Mix using an electric hand mixer or a whisk (or you can do this using the paddle attachment in a stand mixer) until the mixture has thickened and lightened in colour.
- Add the flour, salt, and baking soda, and mix until just combined.
- Place the sugar or sprinkles you are using to roll the cookies into a small bowl. Using a size #60 cookie scoop, scoop 20g balls of dough onto the prepared baking sheets. Roll each ball of dough between your palms to shape it into a ball, then roll each ball in the sugar or sprinkles (I find it easiest to pop it into the bowl and shake the bowl to cover evenly). Arrange the cookies on the baking sheet - I can usually fit 12 per sheet but if you want to divide them evenly then that works too. You do not need to press down the cookies - bake them as balls.
- Bake the cookies for 11-12 minutes (I do one pan at a time), until the edges are set and are lightly golden brown. They may still look a little under done in the middles - this is fine.
- Remove the cookies from the oven and, if desired, use a cookie cutter slightly larger than the cookie to ‘scoot’ them into a perfectly round shape. Leave them to sit for 1-2 minutes, then carefully press a peanut butter cup or hershey’s kiss into the middle of each cookie.
- Leave the cookies to cool on the pan for 10 minutes, then transfer to a wire rack to cool completely.
- Store cookies at room temperature for up to a week.
Notes
You will notice that there are two quantities of butter in the recipe - the initial quantity of butter, then a second measurement in the method which is the quantity of brown butter. The larger initial quantity is to account for water loss when browning - read more about that in my FAQ.
If you are using the recipe scaling feature (2x or 3x) be aware that any quantities, measurements, pan sizes, and cooking times given in the method do not scale automatically - it's only the quantities in the Ingredient List that scale automatically.
Peanut Butter and Jelly Thumbprints
I used this same recipe to make a PB and J style Thumbprint cookie. To do this, made and portioned the dough as directed using the same sized scoop, then made them in the style of my thumbprint cookies - I rolled the outside in chopped roasted salted peanuts, flattened slightly, then used a teaspoon measure to make an indent in the cookies (there are detailed instructions in my thumbprint cookie post). I then filled the indentation with raspberry jam and baked the cookies as directed in this peanut butter blossom recipe. They are super delicious, the nuts on the outside are such a good touch and you really can't go wrong with peanut butter and jam!